
Videos #
Quick Overview #
In-depth Webinar #
Hubbub Pro has a new tool which makes it easier than ever to include a “Save This” form on all of your posts. Your website visitors can enter their email address into this form and email themselves (or, someone else) a link to the page they are on. Optionally, these email addresses can be added to your mailing list in your family mailing list service.
How to get it #
First, be sure your Hubbub Pro plugin is up-to-date. You can update your plugin via your WordPress Admin. This tool is not available in Hubbub Lite.
This new tool is available for all Hubbub Pro+ (Hubbub Pro Plus) licenses no matter how many websites you use Hubbub on. If you do not have Hubbub Pro+ you can upgrade your license in your account.
How to set it up #
First, you’ll need to activate the Save This tool. Unlike Hubbub Pro’s other sharing tools, activating the tool won’t immediately turn on the form on your website. You’ll be given the opportunity to configure the options how you’d like to first. To activate the tool, go to Hubbub > Toolkit in your WordPress Admin and activate the Save This tool under the email category.
Next, Hubbub Pro would like to verify that your WordPress installation is capable of sending email. Notice the email address that the email will be sent to – this is the WordPress Administrator’s email. If you do not have access to this email, or you haven’t filled it in, we recommend doing so in General > Settings and then coming back to finish setting up the Save This tool.

Clicking on “Send Test Email” will send your WordPress Administrator’s email a confirmation email with a link in it. Clicking the link will verify that email is working. 🎉
Note: If you’re sure that sending email works from your website and you do not have access to the email address shown, you can skip this step by clicking the link.
Once verified, the Save This settings page is shown. It has two tabs:
- Forms – Create your Save This forms and choose where each one appears. When you activate Save This, your first form is created for you. (Already using Save This before 2.31.0? Your existing form was moved here automatically, with the same position and post types.) See How to Create Multiple Save This Forms.
- Form Defaults & Email – The default text, colors, and email that every form starts with, plus your mailing list and automation settings. These apply to any form that doesn’t override them.
The Form Defaults & Email tab is broken down into the following areas:
- Preview
- Form Display Settings
- Custom Style
- Email Settings
- Mailing List Options
- Automation Settings
Let’s look at each of these.
Preview #
The preview allows you to see the form’s display that will be inserted into your posts. The preview will update live as you make settings changes.

Form Display Settings #
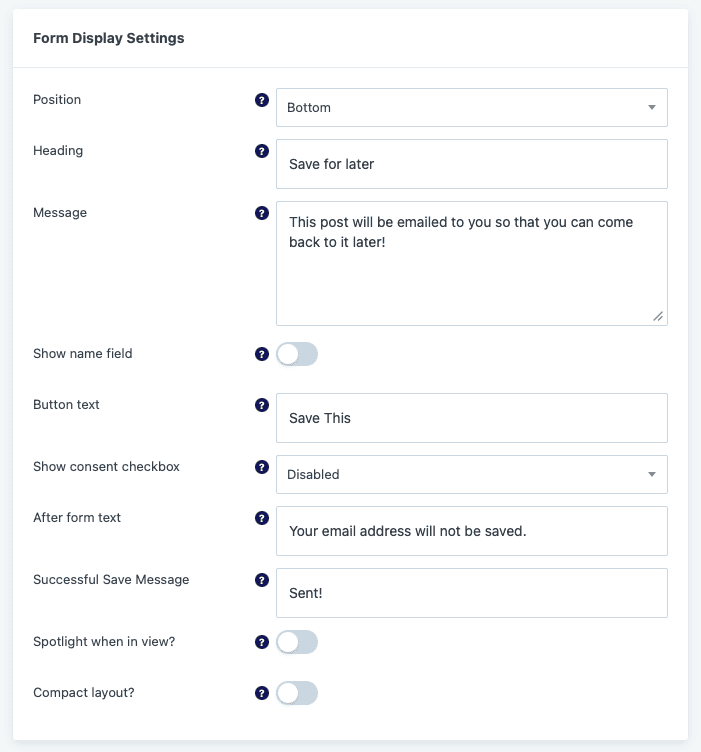
Each part of the form is customizable including the text, whether or not you’ll require consent to send the email (or, require consent to be added to the mailing list), and more. Each setting has a tool tip icon with further details as to what the setting does.
Where’s the Position setting? As of 2.31.0, where a form appears (position, post types, categories, and tags) is set on each form on the Forms tab. A form can appear in more than one position, including before or after your recipe card. See How to Create Multiple Save This Forms.
Exclude from blocks (class or ID) #
Enter CSS classes or IDs, one per line (for example, .elementor-section or #main-content). If a post contains any of them, Save This is placed at the bottom of that post instead of at the top, middle, or after the first image. Use this when a page builder or theme element would otherwise wrap or restyle your form.
Custom Style #

Customize the background color, text color, button color, and button text color using the color picker tools provided. As you change the colors they will be shown in the preview! And, you can type in your own HEX or RGB codes if you know them for your website. Text color applies to the heading, message, and other text inside the form. Leave it blank to use your theme’s text color.
Would you like to customize the form a bit more? Add your own Custom CSS to style the form however you’d like. We have a separate Support Doc with all of the information you need.
Email Settings #
Each time a website visitor uses the form to save a page they receive an email from your website. You can change the from name and email address, write in a short message to them, and add your logo (or any other image) to the email. (We recommend an image no smaller than 400 pixels wide and no larger than 1000 pixels wide.)

Want a different email for a specific form? Each form on the Forms tab has an Email customization (this form) section where you can set its own subject, message, bottom content, and featured image setting. Anything left blank uses these Email Settings. See How to Create Multiple Save This Forms.
Merge fields #
Personalize the email subject, Email Message, and Email Bottom Content with these merge fields:
| Merge field | Replaced with |
|---|---|
{name} | The visitor’s name (if your form shows the name field) |
{post_title} | The title of the saved post |
{email_address} | The visitor’s email address |
{saved_url} | The link to the saved post |
{site_name} | Your site’s title |
{site_url} | Your site’s URL |
{site_domain} | Your site’s domain, such as example.com |
To keep Save This from being used to send spam, the same email address can receive at most 10 Save This emails per hour.
Mailing List Options #
Each visitor that uses the Save This form can be added to your mailing list. Save This currently integrates with MailChimp, MailerLite, MailerLite Classic, Flodesk, Kit (formerly ConvertKit), Constant Contact, Drip, SendFox, and Sender. – with more mailing list services coming soon.

Each service requires slightly different authentication credentials. For this example we’ll use MailerLite – but each service works similarly.
MailerLite requires a token which needs to be generated on their website. We provide a link for each tool’s website to quickly log in and copy the necessary credentials.


Optionally, you can save the subscriber to a specific MailerLite Group if you have them set up on MailerLite.
Each service segments their lists in slightly different ways and with different names. Hubbub attempts to support them all.
Choosing where forms appear #
As of 2.31.0, the Enable Post Types setting has moved onto each form. Go to the Forms tab, and on each form’s card choose its position(s), post types, categories, tags, and exclusions. See How to Create Multiple Save This Forms.
We hope you found this Support Doc useful in setting up your Save This form. If you have any issues please email support@morehubbub.com and we’d be happy to help.
Successful Save Redirect URL #
Use this if you want users redirected after a successful Save This submission.
You’ll find this under Automation Settings on the Form Defaults & Email tab. Accepted formats:
- Relative path like
/thank-you(orthank-you— Hubbub adds the leading slash for you) - Full URL like
https://example.com/thank-you
To redirect only from a specific form, or to show custom content instead of redirecting, use the After successful submission settings in the Save This block. See How to Use the Save This Block.
Kit Creator Network recommendations #
If you use Kit, you can add a Kit Recommendations Script URL in Mailing List Options on the Form Defaults & Email tab.
Important rules #
- Use a valid
http/httpsURL - URL must be on
kit.comor*.kit.com - URL must end in
.js - Paste only the URL, not the script tag
When this script is active, Hubbub disables success redirects so the Kit modal can appear.
Save This stats #
You can monitor Save This usage in:
- The post editor Share Statistics panel
- The post list Save This column
- Google Analytics 4, if you’ve turned on Send Google Analytics Events. See How to Track Shares, Follows, and Save This Signups in Google Analytics 4.
Troubleshooting #
If Save This submits but no redirect happens:
- Verify Successful Save Redirect URL is set
- Check whether Kit recommendations script is enabled
- Clear all caches
If API-based subscription fails:
- Recheck provider API credentials
- Reconnect provider settings
- Test with minimal form customizations first
If the form isn’t appearing where you expect:
- On the Forms tab, check that Auto-insert this form is on and review the form’s position, post types, categories, tags, and exclusions.
- Check the post’s Hubbub Display Options in the editor (Hide checked tools / Show checked tools).
- If the form is at the bottom of the post instead, check the Exclude from blocks setting.
If a reader says they didn’t receive a Save This email after trying several times, they may have hit the limit of 10 Save This emails to the same address per hour. They can try again later.